1. Home
  2. Tips & strategy

Strategy

Mottle Game tips and strategies

Eight habits that follow from how the game actually works — the timings, the cone geometry, and the scoring rules — rather than from generic stealth advice.

Checked: 15 November 2026 Assumes: the live build on 8x.gg Reading time: 7 minutes
Short answer

The short version of these Mottle Game tips: blend early, not late. Camouflage takes 0.75 seconds and a full Alert bar takes about 1.7 seconds of exposure, so the decision that saves you happens before the light arrives.

The best Mottle Game tips start from a simple observation: this looks like a reaction game and plays like a timing game. Almost every death comes from a decision made about half a second too late, and almost every good score comes from a decision made about half a second early.

Each of these Mottle Game tips answers the same three questions: why it works, when to use it, and what to actually do with your hands. If you have not played a round yet, start with the how-to-play guide and come back.

1. Release before the cone arrives, not when it touches you

Camouflage needs about 0.75 seconds of stillness to reach 100%. Alert, once a cone is on you, starts filling immediately at roughly 58% per second.

Why it works
You are not hidden the instant you let go. The last three-quarters of a second before the light arrives is the only window that matters.
When to use it
Every time a cone sweeps toward your tile — especially in rounds four and up, where there are three or four Seekers and cones overlap.
What to do
Watch the outer edge of the cone. When it is about a tile away, release — actually lift your finger or mouse button. Holding still with the pointer down keeps you at 0% camo.
2. Measure cone distance in tiles

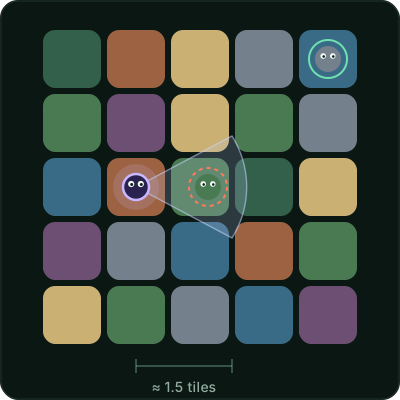
The arena is five tiles wide. At round one a cone reaches about 1.5 tiles; by the late rounds it reaches about 2.1. That is a short reach — shorter than most players assume in the first few seconds of a round.

Why it works
A tile is a fixed, visible unit. "One and a half tiles" is something you can judge at a glance, while "0.3 world units" is not.
When to use it
Before every move into open ground. Two tiles from a Seeker facing you is usually safe; one tile is not.
What to do
Count tiles from the Seeker to your target, not from the Seeker to you. The tile you are moving to is where the risk is.
Mottle Game tips: diagram of a Seeker's light cone on the 5 by 5 arena. The cone reaches about 1.5 tiles; a creature outside it is marked safe, one inside is marked as gaining Alert.
Diagram, not a screenshot. The cone is drawn to scale for round one: roughly 1.5 tiles long and 58° wide. Outside it, camouflage status does not matter.
  • Seeker, sweeping a cone
  • Inside: Alert +58% per second
  • Outside: safe at 0% camo

3. Take short trips instead of long drags

Moving reveals you in about 0.22 seconds, and you stay revealed while you keep moving. Short hops do not make you visible for less time — a three-tile trip takes the same time either way — but they let you stop at every tile, which a single drag does not.

Why it works
Each stop lets camouflage rebuild to 100%. A hop-and-stop journey gives you a safe state at the end of every tile, so a cone that turns mid-route costs you nothing but time.
When to use it
Any time the destination is more than one tile away, and any time a cone could enter your path midway.
What to do
Pick an intermediate tile that sits outside the cone's reach. Move there, stop, count one beat, then continue. It feels slower; it usually is not, because you rarely have to retreat and retry.

4. Use the HIDE countdown as free scouting

Every round opens with three seconds of HIDE!. The Seekers are counting and cannot detect you, so those three seconds carry no risk at all.

Why it works
It is the only part of the round where you can move freely and look at the board without paying for it.
When to use it
The start of every round, and especially after a catch, when the same round restarts with the same layout.
What to do
Find the nearest firefly. Note which direction each Seeker will begin patrolling. Pick your first stopping tile before the countdown ends, then take it.

5. Treat the Alert meter as a budget

Alert fills at about 58% per second in a cone and drains at about 26% per second out of sight. Full is a lost life. That makes 50% a sensible spending limit, not a warning light to ignore.

Why it works
At 50% you can still survive roughly another second of exposure if a cone appears unexpectedly. At 90% you cannot.
When to use it
Constantly. The meter is more informative than the position of any single Seeker, because it aggregates every cone currently on you.
What to do
Above 50%, stop collecting. Break line of sight, wait two seconds, and let the meter fall below 30% before your next move.

6. Take the firefly after the Seeker passes

Fireflies do not expire while the round timer runs. A firefly sitting just behind a patrol path is worth waiting two seconds for.

Why it works
You convert a risky 10 points into a nearly free 10 points, simply by changing the order of your actions.
When to use it
Whenever a firefly is inside or beside a cone. Let the sweep pass, then move in behind it.
What to do
Hide on the tile you are on until the cone is pointing away and the Seeker is moving in the opposite direction. Then take the firefly and stop again immediately.
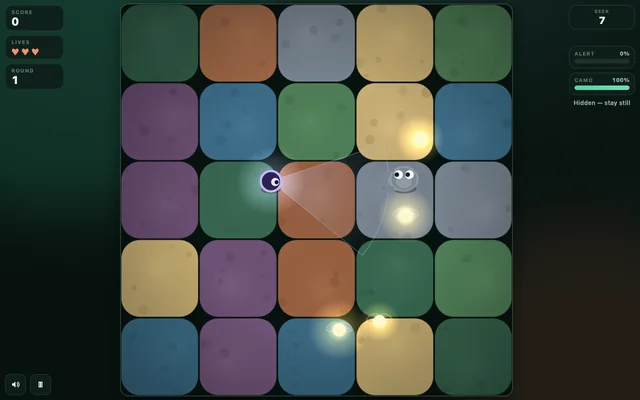
Mottle Game tips in practice: a hidden creature matching the colour of a grey tile while a Seeker's pale light cone sweeps across the neighbouring tiles.
A creature at 100% camo, waiting for the sweep to pass. The tile is only safe while the cone points elsewhere.

7. Always know your second stopping tile

Most lost lives happen when a player arrives somewhere and discovers there is nowhere safe to stop. The game does not punish stopping — it rewards it — but it does punish arriving without a plan.

Why it works
Your next stop is decided while you can still see everything, rather than in the half-second when a cone turns toward you.
When to use it
Before any move of more than one tile, and whenever two cones are visible at once.
What to do
Pick the tile first, then move. If there is no safe tile, do not move yet — wait for the sweep to change the board.

8. Practise in round one, where there is only one Seeker

Round one has a single Seeker and a 13-second seek phase. It is the cheapest classroom in the game, and a catch replays the same round rather than skipping it.

Why it works
One cone is easy to track, so you can concentrate on the timing of release rather than on scanning four directions.
When to use it
When you are learning the game, or coming back after a break. Deliberately play round one slowly instead of rushing into round three.
What to do
Spend a whole round-one seek phase collecting nothing and just practising "cone approaches, I release, cone passes, I move". Of all these Mottle Game tips, this is the one to do first: the timing transfers directly to harder rounds.

Reality check

Where the points actually come from

These are the Mottle Game tips that decide your score, not just your survival.

One of the few Mottle Game tips that changes how you play rather than how you move is this: there are two income streams. Fireflies pay 10 each; clearing a round pays 100 × the round number. In round one that is 100 for surviving versus a maximum of 40 for a clean sweep of four fireflies.

So the safe player and the greedy player end up with similar scores early on — and the safe player keeps their three lives for the rounds where the bonus is actually large. Round six pays 600 just for staying hidden.

The best runs are not the ones that collect the most. They are the ones that reach round six or seven with lives intact, then start taking fireflies that only exist because the board is crowded.

Round bonus versus a full firefly sweep
RoundClear bonusAll fireflies
110040
220050
330060
440070
660090

Checklist

Mottle Game tips: before you start a run

  • I know that blending takes 0.75 seconds, so I release early.
  • I am counting distance in tiles, not guessing.
  • I have a stopping tile in mind before I move.
  • I stop collecting once Alert passes 50%.
  • I let cones pass before taking the firefly behind them.
  • I am playing for the round bonus, not for a full sweep.

Questions

Mottle Game tips FAQ

Which Mottle Game tips matter most?

The Mottle Game tips that matter most are the boring ones: release before the cone reaches you, keep trips short, and let the Alert meter fall before you move again. Everything else is refinement.

Is it better to hide or to collect in Mottle?

Usually hide. Clearing a round pays 100 × the round number; a firefly pays 10. The safe player reaches the rounds where the bonus is large, and the greedy player spends lives to get there.

How do you get a high score in Mottle?

Survive deep into the run. Round six pays 600 for staying hidden, which is more than a clean sweep of every firefly in round one. Take the fireflies that sit on your route and let the rest go.

What happens when you get caught in Mottle?

You lose one of your three lives, Alert resets to zero, and the same round restarts with the same layout. The round number does not go backwards, so a catch costs you a life, not progress.

Does standing still always make you invisible?

Only if you actually let go. A finger or mouse button held down counts as input even when the creature has stopped, so camouflage stays at 0% until you release. Pressing and holding in place is not hiding.

For the exact inputs behind these Mottle Game tips, see the controls guide.